How To Add Crown Molding To Top Of Kitchen Cabinets Cursodeingles Elena
How to Hang Crown Molding on Kitchen Cabinets
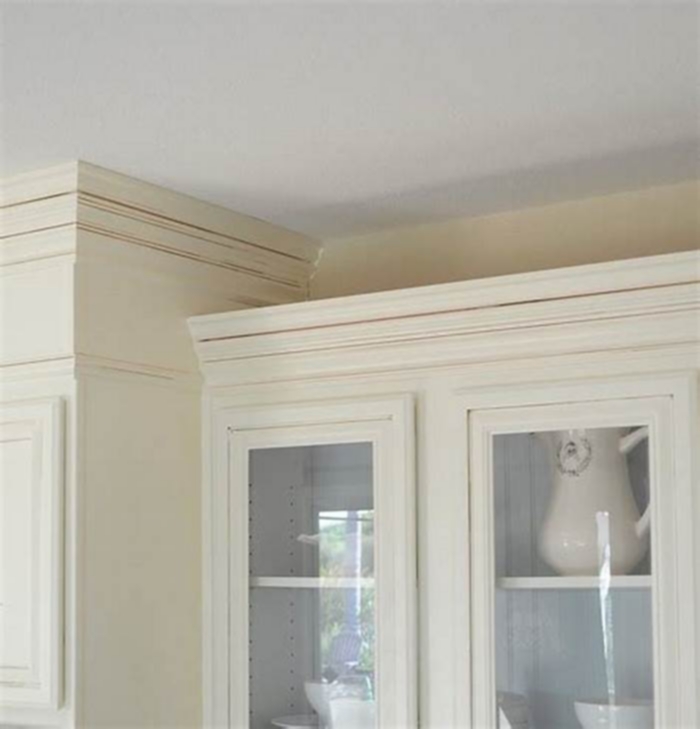
Assuming that cabinets are installed plumb and level, youll want to hang the crown molding in a way that makes the ceilings unevenness as unobtrusive as possible. To do that, the crowns bottom edge has to be level and evenly spaced above the cabinet doors, and it has to remain intact. Any cuts in the crown will be immediately noticeable.
Before You Get Started
First, select a crown molding with a vertical height about the same as the narrowest gap between ceiling and cabinet.
Then glue a 34 -inch-thick strip of clear poplar to the moldings top edge. Make sure the strips front edge and the top of the molding are flush, as shown at right.
When the glue sets, sand or plane the joint so that it wont be visible after painting. Now you can scribe this section to fit tight against the sloping ceiling.

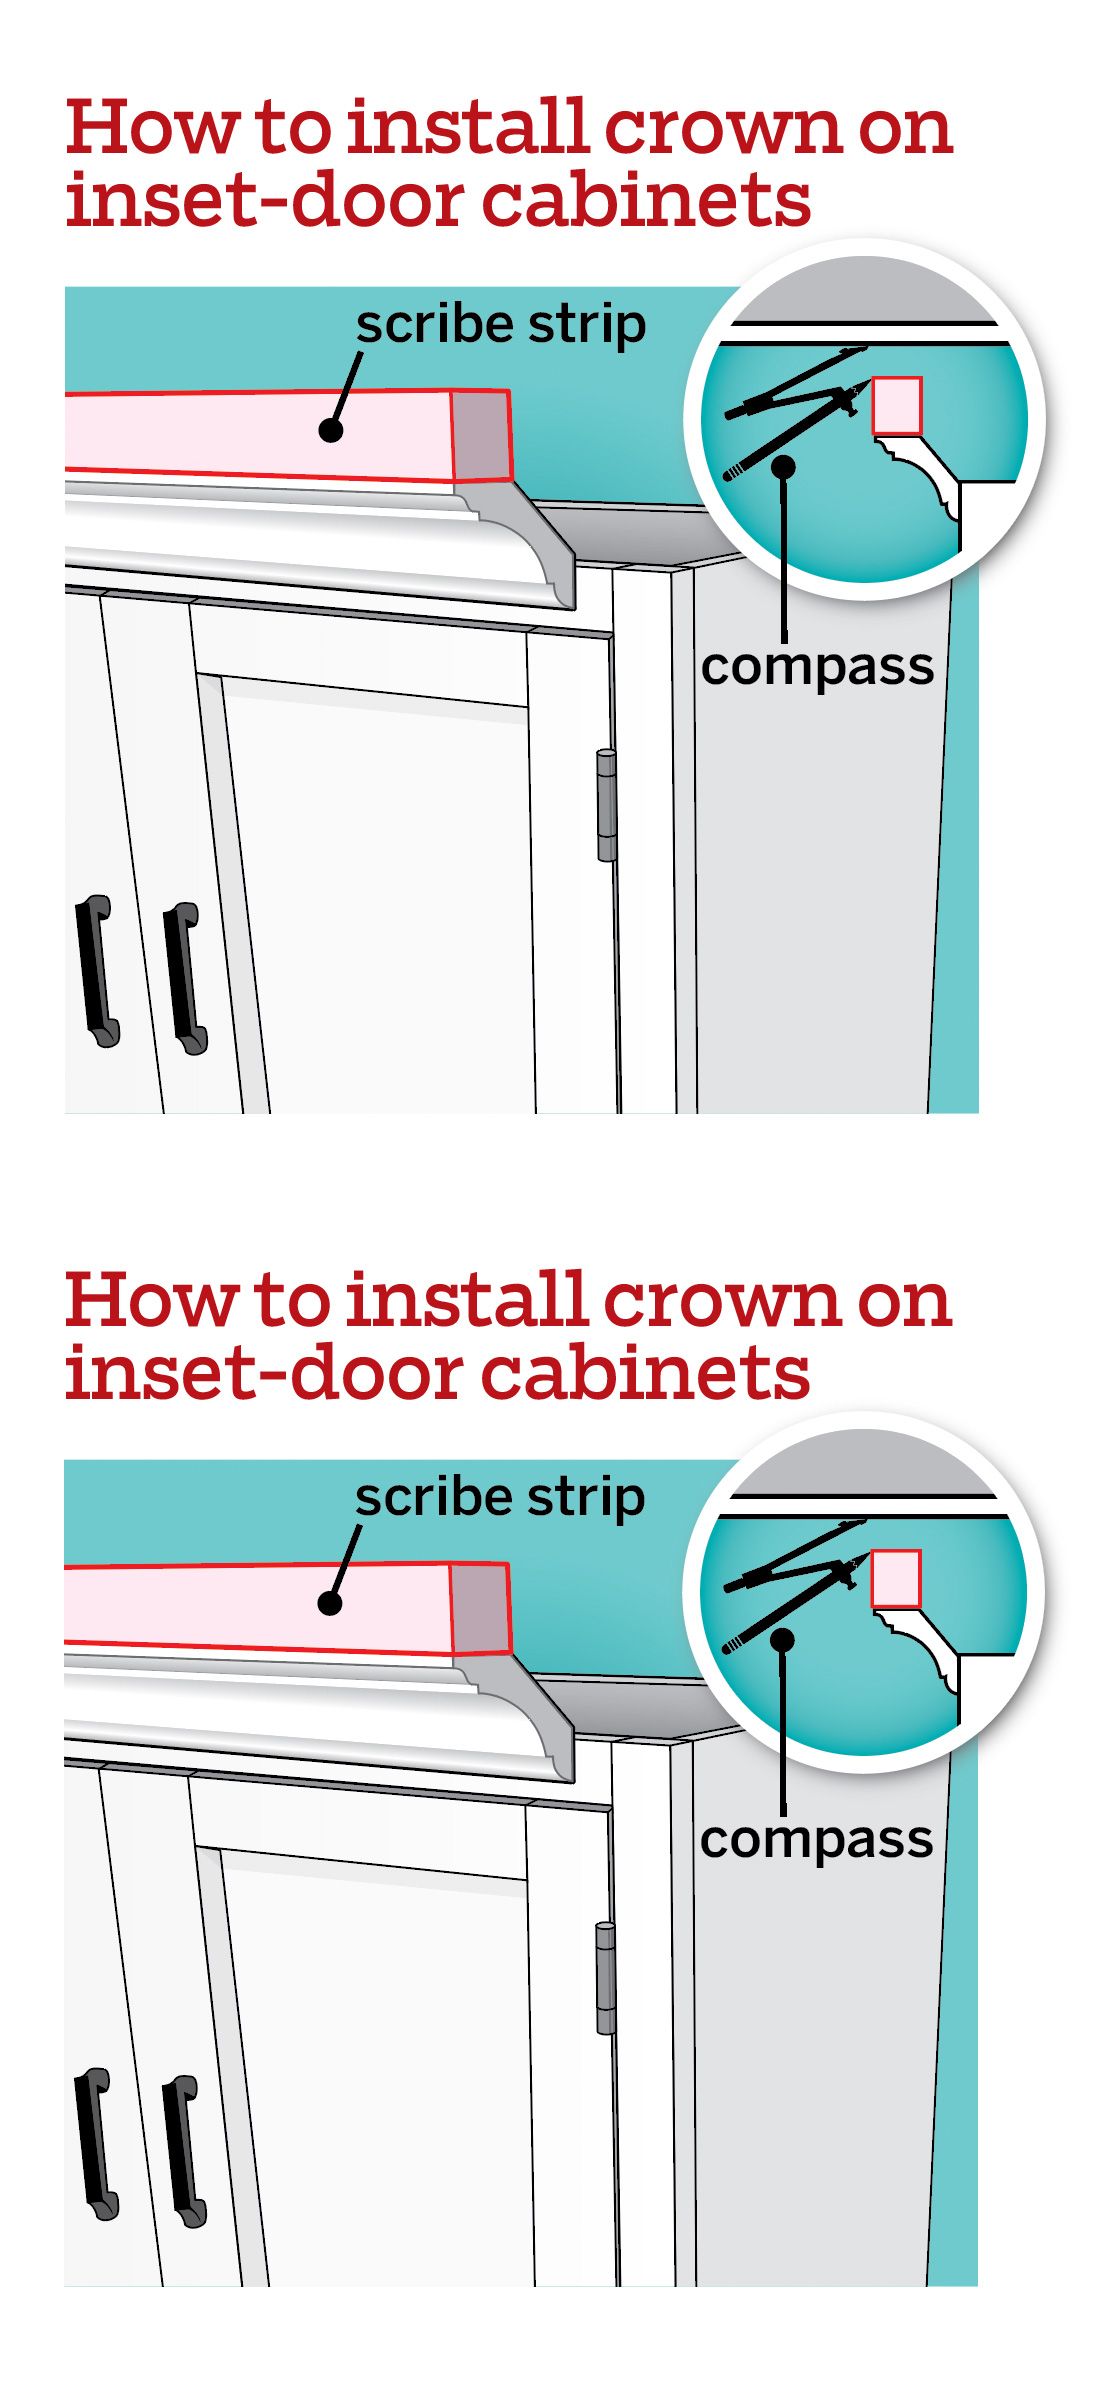
Cabinets with Inset Doors
If your cabinets have inset doors, open them, place the augmented crown in position on the ceiling, and clamp it to the cabinets face frame. Trace a pencil line on the ceiling where it meets the scribe strip, then reclamp the crown so it sits flush with bottom edge of the face-frame top rail. Draw tick marks across this joint to help you align the crown after scribing.
To make the scribe line, set your compass legs to match the widest gap between the crown and ceiling. Keep the legs aligned vertically as you run the compass point along the line on the ceiling and the pencil along the scribe strip. The pencil line will show the ceiling contour.
On cabinets with overlay doors, which have hidden face frames or no frames at all, youll have to mount rabbeted filler pieces to the cabinets tops to give you something to nail the crown to.
The fillers above the doors should sit flush with the door faces; these fillers are held in place with screws driven through the tops of the cabinets. The side fillers sit inside the cabinet frame, flush with the sides. Theyre fastened to the cabinet with a combination of superglue gel, wood glue, and pin nails.
Steps for hanging crown molding:
- Cut strips of the 5/4 pine to length and width, based on the size of the cabinets. These will be the filler pieces.
- Make rabbet cuts on the filler pieces so that the piece fits tightly on the top of the cabinet and over the door of the cabinet.
- Once the cuts are all made, spray paint the filler pieces to match the color of the cabinets in case they show through.
- Mount the filler pieces to the cabinets using super glue to hold it in place and wood glue to more permanently bond it to the cabinet.
- From the sides of the cabinet, nail the filler pieces in the place. For the front filler piece, drill from underneath the inside of the cabinet, and then secure that piece with wood screws.
- Hold up the crown molding on the sides of the cabinet. Be sure the pieces are tight against the wall. Use a pencil to mark from the inside the correct measurement to cut the crown molding. Draw an arrow on the inside to help determine which angle the miter cut should go.
- Hold the crown molding upside down and backwards so that it presses up safely against the fence of the miter saw. To keep it from slipping, you can use some of the clear polyurethane glue and a couple small pieces of wood to glue on the base of the saw to act as stops.
- Turn the miter saw to 45 degrees based on the direction of the mark drawn on the crown molding during measuring. Cut the piece.
- To make the sister cut on the opposite piece of crown molding, turn the saw to the opposite 45 degree angle and cut it again.
- Nail the two pieces together using the brad nailer and then hold the crown molding back up to the cabinet to get the next measurement. Measure and mark the front piece of crown molding. Be sure to also mark the direction of the angle for the crown molding like before.
- Make the miter cut for the front piece of crown molding. Then, make the sister cut for the following side like before.
- Mount the crown molding to the cabinet using the brad nailer. Repeat this process with the rest of the cabinets with outside corners.
- For any cabinets with an inside corner, cut the miters with the opposite 45-degree angle so that the miter angles on the crown molding cut into itself.
- Fill in all the nail holes with wood putty.
- Caulk around the crown molding where it meets the ceiling to give it a finished look.
Resources:
The homeowner had already purchased Shaker-style cabinets that came with the crown molding.
The wood glue and super glue Tom used for the crown molding and the filler pieces are both manufactured by Gorilla Glue.
The other materials Tom used to install the crown molding, including the brad nailer, compressor, and spray paint, are all found at home centers. For the spray paint, Tom recommends getting a fast-drying spray primer with a dry time of one hour.
Expert assistance with this segment was provided by Universal Factory Direct.
Shopping List:
5/4-inch pineFast drying spray primerSuper glueWood glueBrad nailsWood screwsPencilWood puttyPaintable caulking
Tools:
How to Add Crown Molding to Kitchen Cabinets

From door and window casings to baseboards, trim is one of the easiest ways to give any part of your home an upscale look.
But have you ever thought about adding crown molding to your kitchen cabinets?
If youre looking to give your home a remodel, well help you get started with this step-by-step guide on how to add crown molding to kitchen cabinets.
Why You Should Add Crown Molding To a Kitchen Cabinet
There are functional and aesthetic benefits to adding crown molding to your kitchen cabinets.
For one, kitchen cabinets with crown molding have a more finished look to them. They dress up the edges and help your cabinets blend into any kitchen design. Additionally, crown molding can cover up any gaps between your cabinets and ceiling.
Not only does this make your kitchen look better, but it can stop dust from getting trapped on top of your cabinets by closing the gapcleaning crown molding is a lot easier than trying to get in between those tiny gaps.
To top it all off, adding crown molding to your kitchen cabinets is one of the cheapest remodeling projects you can take on. We know that alone is enough to make you anxious to start, but youll need to gather a few supplies first.
Tools and Materials Youll Need:
- Crown molding
- Measuring tape
- Straight edge or level
- Nail gun
- Wood glue
- Miter saw
- Caulk and caulking gun
- Paint
- Paintbrush
- Painters Tape
Now that you have all your equipment, its time to learn how to add crown molding to a kitchen.
Step 1: Measure Your Cabinets
The first step is to measure your cabinets so that you know which type of crown molding and how much youll need to complete your project.
When you get the final measurements, make sure to add more length to your total number. Similar to baseboard, crown molding is cut at an angle, which means your cut piece will need to be longer than the top of your cabinets.
Once youve bought your molding and the necessary equipment, you can move on to step 2.
Step 2: Mark Your Kitchen Cabinets
Before you add your crown molding to a kitchen cabinet, youll want to mark where the molding will sit on the cabinet facing. Use your straight edge or level to get an accurate mark.
Marking Unfinished Oak Cabinets can be easier than marking darker ones like these Faircrest Bristol Chocolate Cabinets, but it can still be done. To mark darker cabinets you can use a white chalk, the marks will be noticeable on the dark surface and can be removed easily.
Step 2B: Add Scrap Wood or a Frame For Gaps
If your cabinets dont reach the ceiling, youll have to add a wooden frame or some scrap wood around the tops to give the molding a surface to sit on.
Step 3: Cut Your Crown Molding
Did you measure twice?
Once youre ready, use your miter saw to cut your molding. You can cut all your pieces at once if youre feeling good about all your measurements, or you can cut as you go to make sure everything fits as you want it to.
Remember, youll be caulking and painting, so if something doesnt line up perfectly youll be able to cover up any small gapsjust make sure theyre not too big.
Safety Tip: Because the molding rests on an angle against the table and the fence of your miter saw, you should place blocks on each side of the blade to safely keep the molding from slipping during cutting.
Step 4: Nail Your Crown Molding Into Place
Place your cut pieces into position and use your nail gun to attach them to the cabinetswooden frame or scratch wood if youre working with cabinets that have a gap.
To ensure the cleanest look possible during painting, a small nail every few inches works. You dont want to use too many, as this will just give you more holes to patch.
Cleaner corners on your kitchen cabinets crown molding: Using nails on the corners of your crown molding can break or splinter the wood. Instead, try putting nail glue between the two pieces of molding and hold them together with painters tape while the glue dries.
Step 5: Caulk and Paint Your Crown Molding
Once youve placed all the crown molding on your kitchen cabinets, you can begin caulking.
Caulk will allow you to fill all the seams and nail holes so you can get a sleek, finished look. It also lets you fill in small gaps that may have occurred during the nailing process.
A good rule of thumb is to let the caulk dry for about an hour before you move on to the finishing touches.
Step 6: Prime and Paint
Theres a good chance that your kitchen cabinets and crown molding wont match right out of the store.
If you went with an unfinished molding, youll need to prime it before painting. You may only need one coat if youre painting your molding white, but darker colors may require two coats.
If your molding came pre-primed like this 5- Primed MDF Crown Molding, you can start painting right away.
Once youve finished painting, youre done! It really is that easy.
The Perfect Kitchen Cabinets and Crown Molding Combination
You dont have to be a master carpenter to learn how to add crown molding to kitchen cabinetsand remember, its not just about knowing how to spruce up your cabinets with crown molding, its also about picking the right combination.
Home Outlet has a wide selection of crown molding and kitchen cabinets so that you can find the right products for your kitchen design.
Contact us today or visit a store near you if you have any questions about our productswell get you on the right track to creating your dream kitchen.
The process:
Placing crown molding at the top of cabinetry is very common in residential design and can be easy to do in Revit. Ideally, I would like to use a sweep with a crown molding profile, but Revit utilizes sweeps only for walls when not in the family editor. The trick to making this an easy process for the user is to create a specialty wall that has the desired sweep profile built into it. This allows you draw the wall to follow the front edge of the cabinetry at the desired elevation for the crown molding.
The following image shows the resultant crown molding.
Essential Guide to Kitchen Cabinet Molding Types
Apr 09, 2024in Kitchen Design Inspiration,Kitchen Layouts,Kitchen Makeovers & Remodeling,Kitchen RemodelingKitchen Cabinet Molding Types
Kitchen cabinet moldings are a key detail that can truly transform the look of your kitchen. Its not just about the cabinets themselves but about framing them in a way that adds style and character to your space. Molding can take a simple kitchen design and elevate it, making any kitchen look finished and polished.
Molding comes in various types, each serving a unique purpose and adding a different element of design to your kitchen. Whether you are remodeling your kitchen or just looking to add some finishing touches, understanding the different types of cabinet molding is essential to utilize the space within your kitchen.
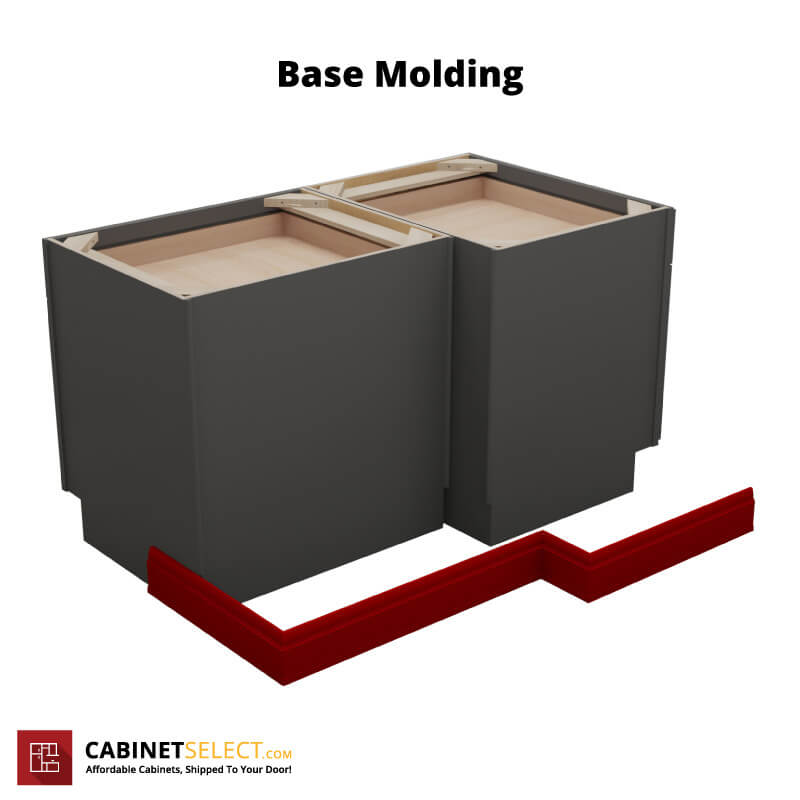
Base Molding
Base molding sits at the bottom of your cabinets, giving them a solid, grounded look. Its like the shoes for your cabinets, finishing off the look and tying everything to the floor and usually ends at the cabinets toe kick area, which is that recessed space at the bottom, making your cabinets look complete and grounded.
Besides its aesthetic appeal, base molding helps protect the bottom of your cabinets from wear and tear, scuffs, and scratches. Its an essential detail that adds both beauty and functionality to your kitchen cabinets. Also when remodeling a space with existing cabinetry a base molding and a shoe molding combined can help you hide your new flooring cut edges (tiles, wood).
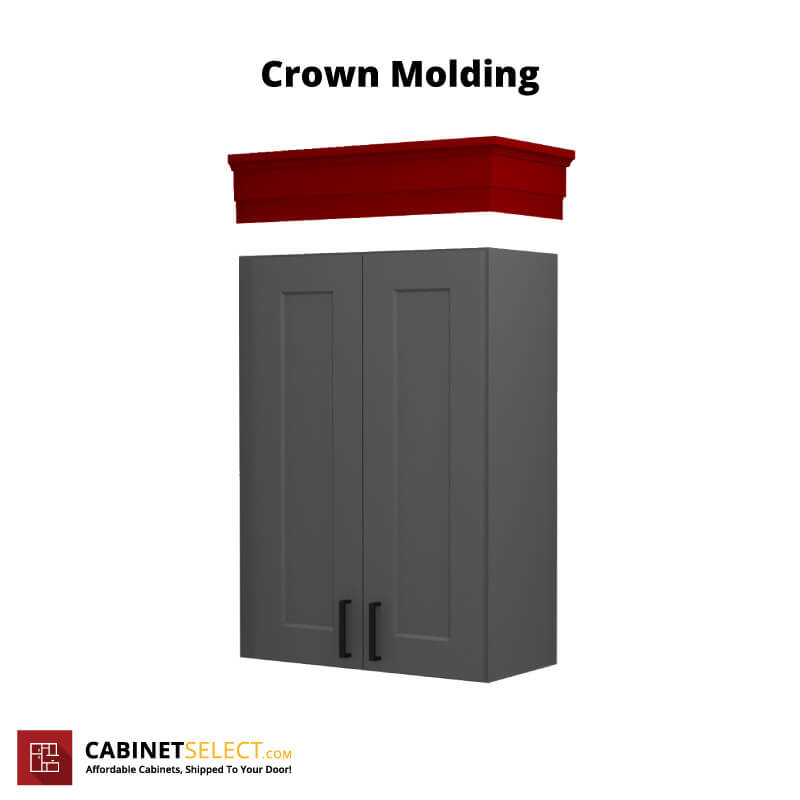
Crown Molding
Crown molding is all about adding elegance and a touch of sophistication to your kitchen cabinets. It sits at the top of your cabinets, creating a smooth transition between the cabinetry and the ceiling. This type of molding adds height and drama to your kitchen, drawing the eye upward and making the space feel larger and more open.
Crown molding comes in a variety of styles, each bringing its own flavor to the design, allowing you to customize the look to fit your personal style and the overall design of your kitchen. Here are some of the various types of crown moldings:
- Simple Crown Molding: This style is all about clean lines and a sleek look. It is perfect for a modern kitchen where you want a touch of detail without overwhelming the space.
- Traditional Crown Molding: With more intricate designs and patterns, traditional crown molding adds a classic elegance to your kitchen. Its great for adding character to your cabinets.
- Shaker Crown Molding: This type emphasizes functionality with a straightforward, uncluttered design. It complements the minimalist style of Shaker cabinets perfectly.
Looking For Cabinets For Your Next Project?
Let Us Help You Envision and Price out Your Kitchen or Bathroom Cabinets.
Get Free Kitchen Design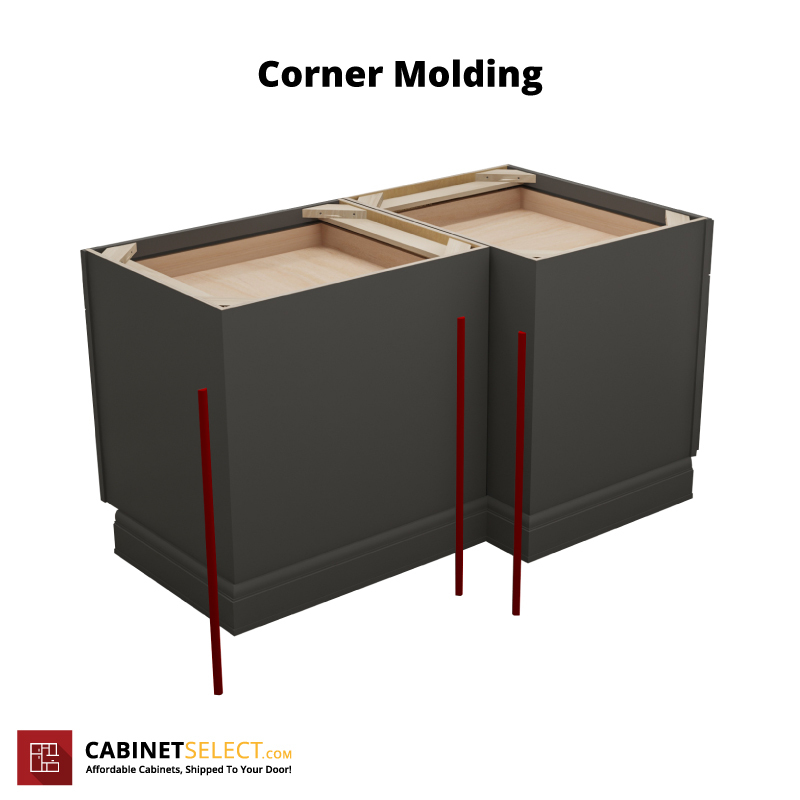
Corner Molding
Corner molding plays a crucial role in the overall look of your kitchen cabinets. It is used to cover and beautify the corners of your cabinets, whether they are outside corners that jut out into the room or inside corners where two sets of cabinets meet. This type of molding can soften the edges of your cabinets, making the kitchen feel more inviting, or it can define the corners, adding a sharp, architectural element to the space.
Corner molding is not just about aesthetics but it also protects the corners of your cabinets from bumps and bruises, keeping them looking new for longer. With various styles available, you can choose corner molding that complements your kitchens design, whether you are going for a sleek, modern look or a more traditional feel.
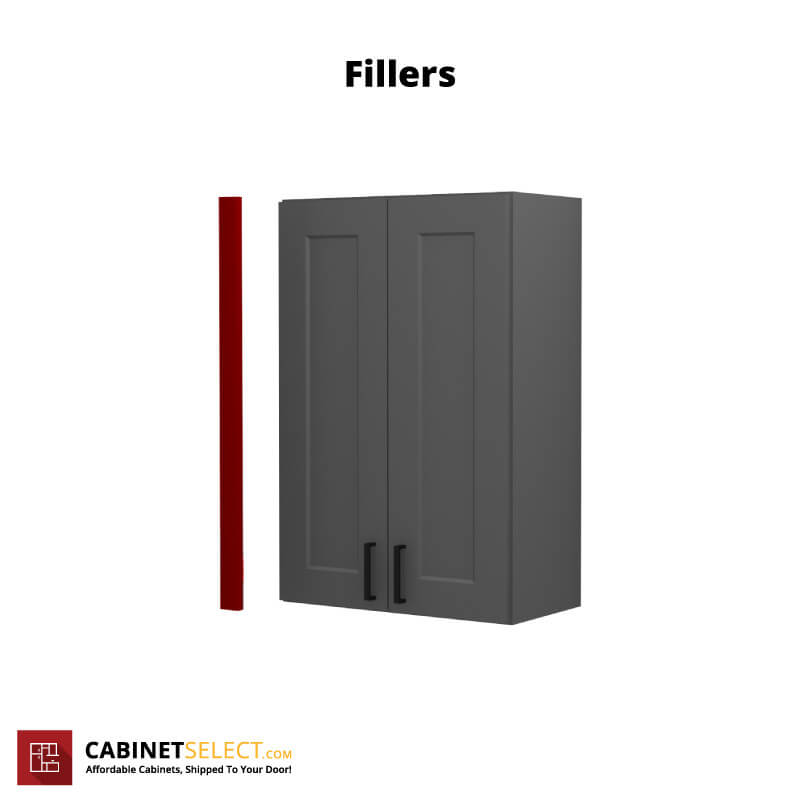
Fillers
When you are fitting cabinets in your kitchen, sometimes the standard cabinet sizes might not fill perfectly your space. Thats where fillers come in. These are strips of wood that fill in the gaps and get attached to the frame of the cabinet, making sure everything looks like it was made just for your kitchen. Without fillers, you might see spaces that make the cabinets look like they were just stuck on the wall without much thought. To make a smooth, finished look, it is also suggested that you use overlay fillers also. Overlay fillers sit on top of the standard fillers to create a flush look with the door as if your cabinets were custom-made to fit perfectly in your space.
They also help make sure your cabinets are properly spaced. This means your doors and drawers can open without hitting each other or the walls. Its a small detail, but it makes a big difference in making your kitchen both beautiful and functional.
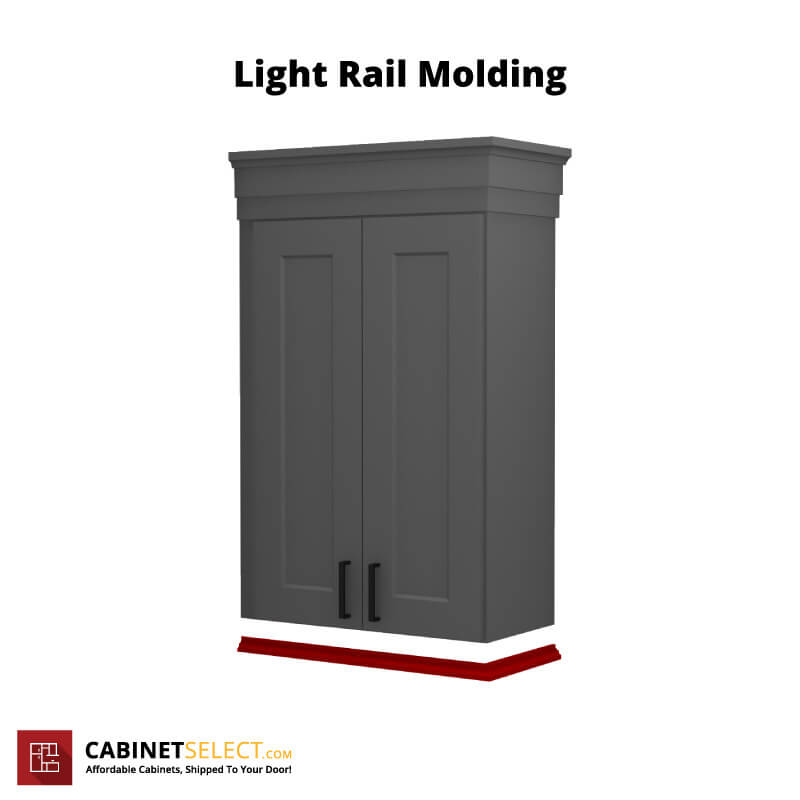
Light Rail Molding
Have you ever noticed the molding at the bottom of wall cabinets? Thats called light rail molding. It is not just there for decoration. One of its main jobs is to hide the lights that are installed under the cabinets. This way, you get the benefit of extra lighting on your countertop without seeing the fixtures themselves. It makes your kitchen look cleaner and more stylish.
Looking For Cabinets For Your Next Project?
Let Us Help You Envision and Price out Your Kitchen or Bathroom Cabinets.
Get Free Kitchen Design
Riser Molding
Riser molding, sometimes called starter molding, is used when you are installing cabinets and you want them to look a bit taller or more grand. This molding is placed on top of the cabinets but below any additional decorative molding, like crown molding. It essentially lifts everything up, giving you a bit more space between the top of the cabinet and the ceiling or the next row of cabinets.
This extra space is not just for looks. It can be practical, too. It gives you room to add lighting or decorative items above your cabinets, making your kitchen feel more custom and thoughtfully designed. Its a simple addition that can make a big impact on the overall look of your kitchen.
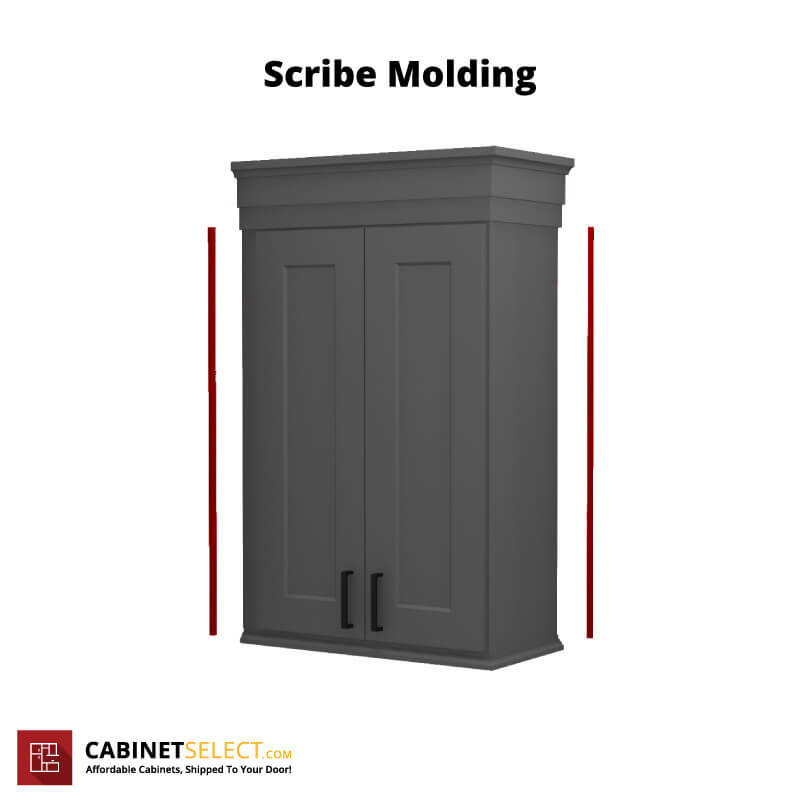
Scribe Molding
Not all walls are perfectly straight, but your cabinets need to look like they fit snugly against them. This is where scribe molding comes into play. Its a thin strip of wood that fills any gaps between your cabinets and the wall. With scribe molding, your kitchen installation looks precise and tidy, no matter the shape of your walls.
This type of molding is especially useful in older homes where the walls might have settled and are not completely flat. It allows your cabinets to have a custom-fit look, making your kitchen seem perfectly put together, even if the space you are working with is a bit challenging.
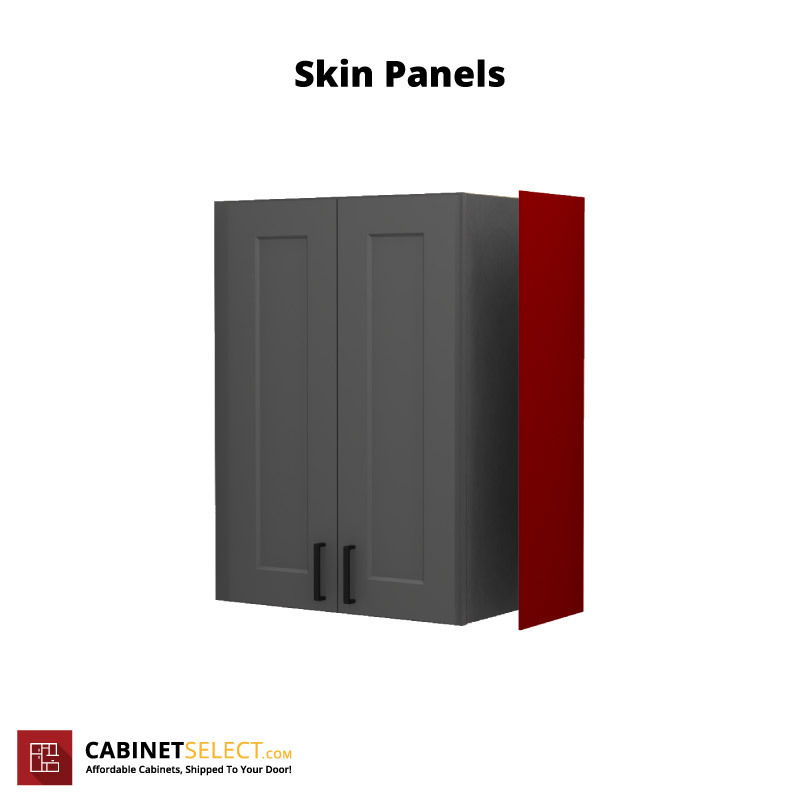
Skin Panels
Sometimes, the sides of your cabinets are going to be visible and you will be able to see where 2 cabinets are put next to each other (connection line). Thats where skin panels come into play. These panels are attached to the exposed sides of the cabinets, ensuring that they have the same finish as the doors and drawer fronts. This way, no matter where you look in your kitchen, everything appears uniform and cohesive.
Skin panels are key for making your kitchen look seamless. They cover any raw sides of the cabinets, giving your kitchen a polished and complete look. Whether your cabinets are placed at the end of a run or you have an island or if you are trying to make custom depths to cover high end appliances or any other custom build out, skin panels ensure that every angle of your kitchen is beautiful and fully covered.
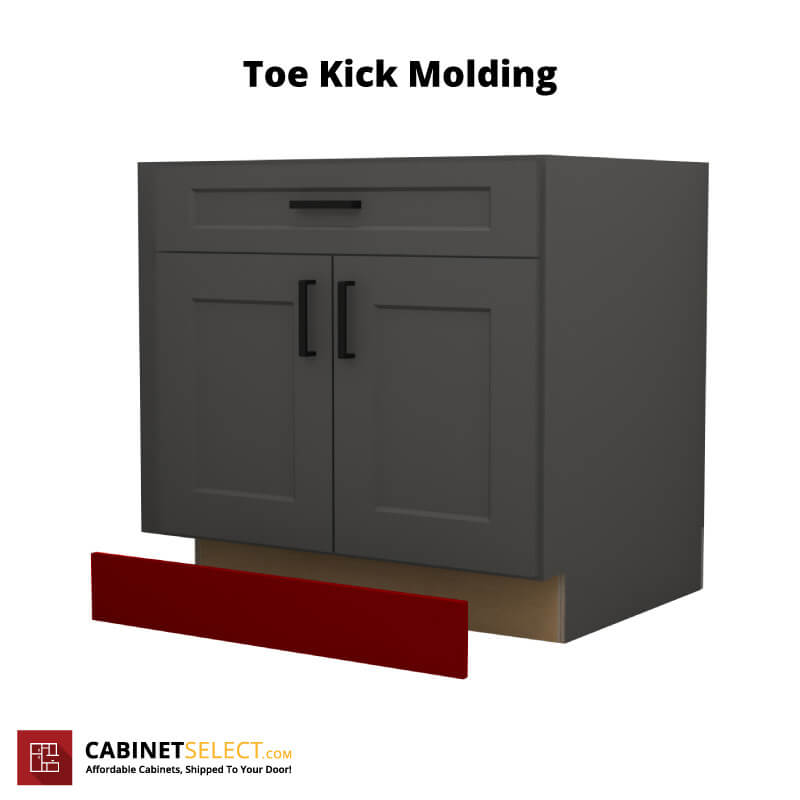
Toe Kick Molding
Toe kick molding is a key element in kitchen cabinet design that many might overlook, yet it serves a critical role in both functionality and aesthetics. Positioned at the base of your cabinets, toe kick molding offers protection against scuffs and damage that can occur from foot traffic, cleaning, or the hustle and bustle of kitchen activity. It essentially acts as a shield, keeping the bottom edges of your cabinets looking neat and damage-free.
Beyond protection, toe kick molding contributes to the overall design coherence of your kitchen. It creates a smooth transition from your cabinets to the flooring, giving the space a finished and polished look. This detail, while small, plays a significant part in the overall feel of your kitchen, ensuring that every aspect from top to bottom is considered and cohesive.
Looking For Cabinets For Your Next Project?
Let Us Help You Envision and Price out Your Kitchen or Bathroom Cabinets.
Get Free Kitchen DesignFrequently Asked Questions
- What is cabinet molding and why is it important?Cabinet molding is a decorative piece of wood that adds detail and finish to kitchen cabinets. Its important because it enhances the overall look of your kitchen, covers unsightly gaps, and can even protect cabinets from damage.
- How can I choose the right type of molding for my kitchen cabinets?Consider the style of your kitchen and cabinets. Each type of molding serves a different purpose and adds a unique touch, so select one that complements your kitchens aesthetic and meets your functional needs. When you work with us, ask your designer to show you how your kitchen can be transformed using the different types of available moldings.
- Can I add molding to existing cabinets?Yes, you can add molding to existing cabinets. Its a great way to update the look of your kitchen without a full renovation.
- Where can I buy cabinet moldings?You can buy cabinet moldings from CabinetSelect.com > https://cabinetselect.com/rta-kitchen-cabinets/moldings/
- How do I install cabinet moldings?Installing cabinet molding can range from straightforward to complex, depending on the type. It typically involves measuring, cutting, and attaching the molding to the cabinets with nails or adhesive. For detailed or custom installations, it may be best to hire a professional.
ABOUT THE AUTHOR
 Chris Alexakis
Chris is Director of Product & Design here at CabinetSelect.com. He's certified as a Florida State Building Contractor (CBC1256670) with many years of construction experience. Most important, Chris is passionate about kitchen design Whether you're building a new home or remodeling an old one, he has plenty of experience and the right tools, ideas and solutions to help create a beautiful kitchen in any space, large or small.


